Omio
Last updated January 9, 2024
Attention
WEAR SAFETY GOGGLES *AND* EAR PROTECTION when using the machine.
Instructions
Make sure all the switches on the extension cord under the Omio are turned ON.
Refer to the video for visual help.
Place the box channel in between the edge of the metal frame and tighten the screw — metal hex part — so that you can secure the box channel in place.
Pick a drill bit from under the machine - standard size will be 5.0 as it’s the size for rivets on box channels - this might vary depending on situations.
Open the chucks and collets box and grab
Two wrenches.
One collet - your drill bit should fit smoothly into the collet.
Unscrew the nut on the drill bit, and put the collet onto the rim w/out drill bit.
Hear a “click” - successfully “docked” into the rim.
On the other side of the rim, insert the drill bit so that the pointy tip points outside.
Screw this part back onto Omio - use wrenches to further tighten.
Put wrenches back in place - we don’t want it to get messy! Please stay organized.
Close the Omio polycarb windows.
Now you’re going to zero on the Omio PC.
Move Omio drill using arrow keys.
Line the bit up to the left back corner.
Click REF ALL HOME.
Machine will now traverse into position.
Move the Omio bit over the box channel to zero the z-axis (height 3D).
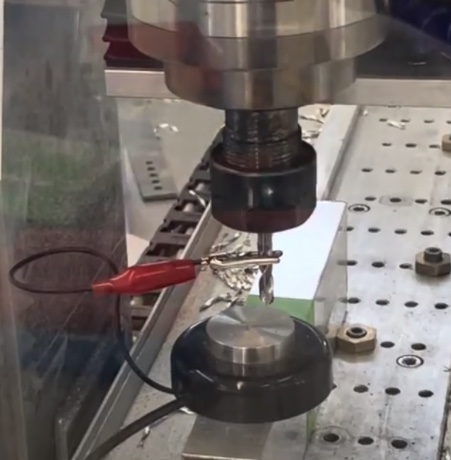
Place the puck in between the box channel and the drill bit.
Caution
Caution: make sure the puck is plugged in and can detect! If not, it will break the machine!! Please make sure this is plugged in.
Connect the alligator clip to the drill bit.
Go to pc, click Auto Tool Zero under Tool Information.
The second drill bit touches the puck, it should immediately go up. If not, you probably didn’t plug the puck in. Oops! You’re in trouble!
The puck works by finishing a circuit when the drill bit touches the puck.
Remove the alligator clip and the puck.
Click RESET and GO TO ZERO.
Drill bit should be exactly on top of the left corner.
Use arrows to place the drill bit over the corner.
Check from the side and the front.
Click ZERO X and ZERO Y under the coordinates.
You are ready to cut!
Click Load G Code on the left side of the screen, select the G code.
In the vid tutorial, we select MechEBoxHoles (which is standard).
Check that the g code file is loaded on the top left corner of the screen.
G code codes for the path of the Omio - or CAM file.
Adjust the blue hose (cool air) and place the nozzle right next to the drill bit (don’t touch, just close enough) - this will cool the drill bit down and suck in particles.
This is LOUD! You might want to wear ear protection.
Slightly turn the green valve to open the air - you should hear air flow.
Click Cycle Start to begin the cut.
Pro Tip (MUST): Mouse should always hover over Stop <ALT + S>.
After Omio completely stops, turn OFF the air valve and take the box channel.
ASK IF YOU HAVE ANY QUESTIONS!!!!